Running nUnit and Jasmine.JS unit tests in TFS/VSO vNext build
This article was first published on the Microsoft’s UK Developers site as Running nUnit and Jasmine.JS unit tests in TFS/VSO vNext build
With the advent of vNext build in TFS 2015 and Visual Studio Online running unit tests that are not MSTest based within your build process is far more straightforward than it used to be. No longer do you have to use custom XAML build activities or tell all your TFS build controllers where the test runner assemblies are. The ‘out the box’ vNext build Visual Studio Test task will automatically load any test adaptors it finds in the path specified for test runners in its advanced properties, a path that can be populated via NuGet.
Running nUnit tests
All this means that to find and run MSTest and nUnit tests as part of your build all you have to do is as follows
Create a solution that contains a project with MStest and nUnit tests, in my sample this is a MVC web application project with its automatically created MSTest unit tests project.
In the test project add some nUnit tests. Use NuGet to add the references to nUnit to the test project so it compiles.
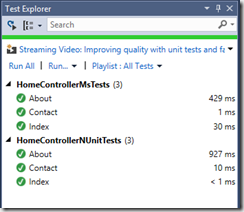
Historically in your local Visual Studio instance you needed to install the nUnit Test Runner VSIX package from Visual Studio Gallery – this allows Visual Studio to discover your nUnit tests, as well as any MSTest ones, and run them via the built in Test Explorer
**
IMPORTANT Change –** However installing this VSIX package is no longer required. If you use Nuget to add the nUnit Test Runner to the solution, as well as the nUnit package itself, then Visual Studio can find the nUnit tests without the VSIX package. This is useful but not world changing on your development PC, but when on the build box it means the NuGet restore will make sure the nUnit test adapter assemblies are pulled down onto the local build boxes file system and used to find tests with no extra work.
**
Note**: If you still want to install the VSIX package on your local Visual Studio instance you can, it is just you don’t have to.Check in your solution into TFS/VSO source control. It does not matter if it is TFVC or Git based
Create a new vNext build using the Visual Studio template
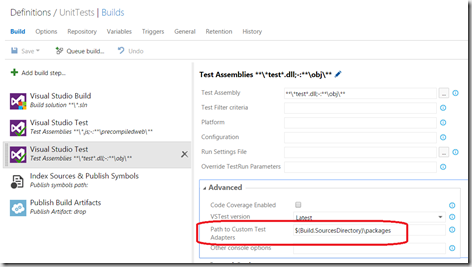
You can leave most of the parameters on default setting. But you do need to edit the Visual Studio Test task’s advanced settings to point at the NuGet packages folder for your solution (which will be populated via NuGet restore) so the custom nUnit test adaptor can be found i.e. usually setting it to $(Build.SourcesDirectory)packages
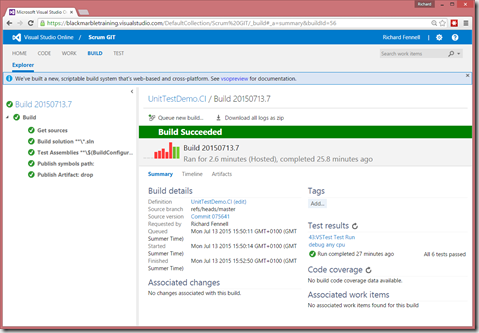
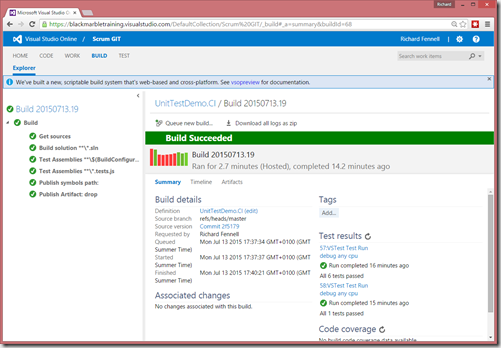
The build should run and find your tests, the MStest ones because they are built in and the nUnit ones because it found the custom test adaptor due to the NuGet restore being done prior to the build. The test results can be found on the build summary page
But what if you want run Jasmine.JS test?
If you want to run Jasmine JavaScript unit tests the process is basically the same. The only major difference is that you do still need to install the Chutzpah Test runner on your local Visual Studio as a VSIX package to run the tests locally. There is a NuGet package for the Chutzpah test runner so you can avoid having to manually unpack the VSIX and get it into source control to deploy it to the build host (unless you really want to follow this process), but this package does not currently enable Visual Studio to find the Jasmine tests without the VSIX extension being installed, or at least it didn’t for me.
Using the solution I used before
Use NuGet to add Jasmine.JS to the test project
Add a test file to the test project e.g. mycode.tests.js (adding any JavaScript references needed to find any script code under test in the main WebApp project)
Install the Chutzpah Test runner in your local Visual Studio as a VSIX extension, restart Visual Studio
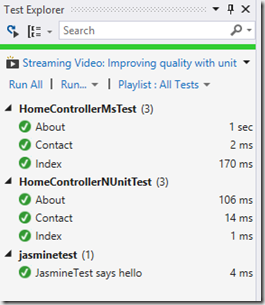
You should now be able to see and run the Jasmine test run in the test runner as well as the MSTest and nUnit tests.
Add the NuGet package for the Chutzpah test runner to your solution, this is a solution level package, so does not need to be associated with any project.
Check the revised code into source control
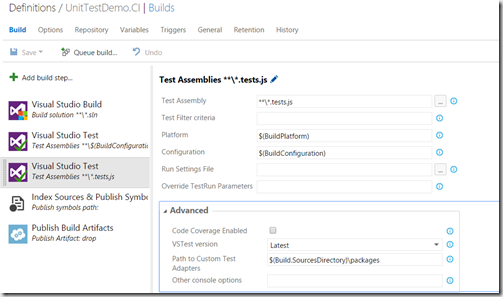
In your vNext build add another Visual Studio Test task, set the test assembly to match your javascript test naming convention e.g. ***.tests.js and the path to the custom test adaptor to $(Build.SourcesDirectory)packages (as before)
Run the revised build.
You should see the two test tasks run and a pair of test results in the summary for the build.
So now hopefully you should find this a more straight forward way to added testing to your vNext builds. Allowing easy use of both your own build boxes and the hosted build service for VSO with testing frameworks they do not support ‘out the box’
