Migrating work items to VSTS with custom fields using TFS Integration Platform
If you wish to migrate work items from TFS to VSTS your options are limited. You can of course just pull over work items, without history, using Excel. If you have no work item customisation them OpsHub is an option, but if you have work item customisation then you are going to have to use TFS Integration Platform. And we all know what a lovely experience that is!
Note: TFS Integration Platform will cease to be supported by Microsoft at the end of May 2016, this does not mean the tool is going away, just that there will be no support via forums.
In this post I will show how you can use TFS Integration platform to move over custom fields to VSTS, including the original TFS work item ID, this enabling migrations with history as detailed in my MSDN article
TFS Integration Platform Setup
Reference Assemblies
TFS Integration Platform being a somewhat old tool, design for TFS 2010, does not directly support TFS 2015 or VSTS. You have to select the Dev11 connection options (which is TFS 2012 by its internal code name). However, this will still cause problems as it fails to find all the assemblies it expects
The solution to this problem is provided in this post, the key being to add dummy registry entries
- Install either
- Visual Studio Ultimate 2012
- Team Explorer 2012
- Or the Visual Studio Object Model
- Add the following registry key after you have installed Team Explorer or equiv.
 1Windows Registry Editor Version 5.00
 2
 3\[HKEY\_LOCAL\_MACHINESOFTWAREWow6432NodeMicrosoftVisualStudio11.0InstalledProductsTeam System Tools for Developers\]
 4
 5@="#101"
 6
 7"LogoID"="#100"
 8
 9"Package"="{97d9322b-672f-42ab-b3cb-ca27aaedf09d}"
10
11"ProductDetails"="#102"
12
13"UseVsProductID"=dword:00000001
MSI
Once this is done the TFS Integration Tools installation should work.
Accept the default options, you will need to select a SQL server for the tool to use as a database to store its progress. The installer will create a DB called tfs_integrationplatform on the SQL instance
Creating a Mappings File
TFS Integration platform needs a mapping file to work out which fields go where.
We assume there is a local TFS server with the source to migrate from and a VSTS instance containing a team project using a reasonably compatible uncustomised process template
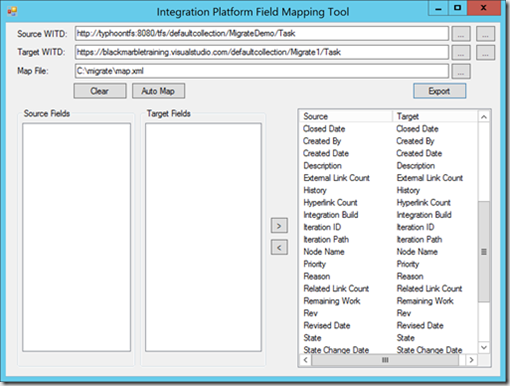
Download the TFS Process Mapper and run it.
You need to load into the process mapper the current work item configuration, the tools provides buttons to do this from XML files (exported with WITADMIN) or directly from the TFS/VSTS server.
You should see a list of fields in both the source and target server definitions of the given work item type.
Use the automap button to match the fields
Any unmatch fields will be left on the left columns
Some field you may be match manually e.g. handing name changes from ‘Area ID’ to ‘AreadID’
If you have local custom fields you can add matching fields on the VSTS instance, this is done using the process on MSDN.
Once you have added your custom filed I have found it best to clear the mapping tool and re-import the VSTS work item definitions. The new fields appear in the list and can be mapped manually to their old equivalents.
I now exported my mappings file.
This process described above is the same as manually editing the mapping file in the form
<MappedField MapFromSide="Left" LeftName="BM.Custom1" RightName="BMCustom1" />
There is a good chance one of the fields you want is the old TFS servers work item. If you add the mapping as above for System.ID you would expect it to work. However, it does not the field is empty on the target system. I don’t think this is a bug, just an unexpected behaviour in the way the unique WI IDs are handled by the tool. As a workaround I found I had to also be an aggregate field to force the System.ID to be transferred. In my process customisation on VSTS I created an Integer OldId custom field. I then added the following to my mapping, it is important to note that I don’t use the line in the mappedfields block, I used a AggregatedField.<MappedFields> <-- all auto generated mapping stuff, This is where you would expect a line like the one below <MappedField MapFromSide="Left" LeftName="System.Id" RightName="OldID" /> –> </MappedFields> <AggregatedFields> <FieldsAggregationGroup MapFromSide="Left" TargetFieldName="OldID" Format="{0}"> <SourceField Index="0" SourceFieldName="System.Id" valueMap=""/> </FieldsAggregationGroup> </AggregatedFields>I could now use my edited mappings file
Running TFS Integration Platform
I could now run the TFS Integration tools using the mappings file
- Load TFS Integration Platform
- Create a new configuration
- Select the option for work items with explicit mappings
- Select your source TFS server
- Select your target VSTS server
- Select the work item query that returns the items we wish to move
- Edit the mapping XML, but and past in the edited block from the previous section. Note that if you are moving multiple work item types then you will be combining a number of these mapping sections
- Save the mapping file, you are now ready to use it in TFS Integration Platform
And hopefully work migration will progress as you hope. It might take some trial and error but you should get there in the end.
But really……
This all said, I would still recommend just bring over the active work item backlog and current source when moving to VSTS. It a easier, faster and give you a chance to sort out structures without bringing in all your poor choices of the past.
