Steps Required to Configure WSUS to Distribute Windows 10 Version 1511 Upgrade
Microsoft recently made a hotfix available that patches WSUS on Windows Server 2012 and 2012 R2 to allow Windows 10 upgrade to version 1511. Installing the update is not, however, the only step that is required…
- Install the hotfix. This can be downloaded from https://support.microsoft.com/en-us/kb/3095113. Ensure that you pick the appropriate hotfix for the version of Windows Server on which you’re running WSUS. Note that if you’re running Windows Server 2012 R2, there’s also a pre-requisite install.
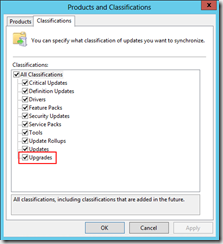
- Once the hotfix is installed and you’ve restarted your WSUS server, look in the ‘Products and Classifications’ option under the Classifications tab and ensure that the checkbox for upgrades is selected. This is not selected automatically for you:
 Note that the upgrade files may take quite some time to download to your WSUS server at the next synchronisation.
 - Add a MIME-Type for ‘.esd application/octet-stream’ in IIS on the WSUS server. To do this: Open IIS Manager Select the server name From the ‘IIS’ area in the centre of IIS Manager, open ‘MIME Types’ Click ‘Add…’ Enter the information above:
 Click OK to close the dialog. Note: Without this step, clients will fail to download the upgrade with the following error: Installation Failure: Windows failed to install the following update with error 0x8024200D: Upgrade to Windows 10 [SKU], version 1511, 10586.
 - Approve the Upgrade for the classes of computer in your organisation that you want to be upgraded.
Once all of the above steps are in place, computers that are targeted for the upgrade should have this happen automatically at the next update cycle.