Remote Mounting an ISO Image from Hyper-V
Building a Hyper-V virtual machine from scratch almost always seems to involve mounting an ISO image at some point during the installation process. I suspect that like us, many other organisations already have a network location in which we store ISO images. The ability to mount an ISO image from our usual network location saves us having to copy the ISO images to the local Hyper-V servers.
The ability to remote mount an ISO image requires that a couple of configuration changes are made. Attempting to remote mount an ISO image without making the configuration changes usually results in an err along the lines of
Inserting the disk failed
Failed to add device ‘Microsoft Virtual CD/DVD Disk’
The file ‘\\RemoteServer\Share\ISO_Image.iso’ does not have the required security settings. Error: ‘General access denied error’
There are two configuration changes that need to be made. The first is ensuring that the Hyper-V hosts can access the share itself that contains the ISO images. As a workaround, you can always grant ‘Everyone’ read access to the share. If you want to control access to individual servers, you need to specify the Active Directory computer object for each server you want to give access to.
The second configuration change that is required to to grant Constrained Delegation on the virtual host objects in Active Directory:
- Log onto a domain controller and open Active Directory Users and Computers from the Administrative Tools menu, or open the remote administration Active Directory tools from another server or client
- Locate the Hyper-V host computer object
- Right-click the object and Select Properties from the context menu
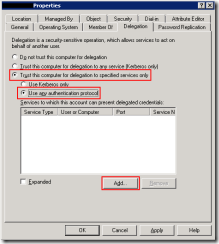
- Select the Delegation tab
- Select the ‘Trust this computer for delegation to specified services only’ radio button and then the ‘Use any authentication protocol’ radio button
- Click the ‘Add’ button:

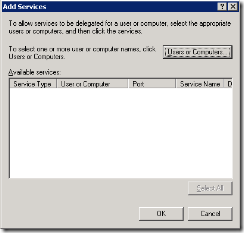
- The ‘Add Services’ dialog will open:

- Click the ‘Users or Computers’ button and add the remote server hosting the ISO images. Click OK
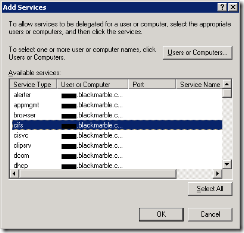
- Select the ‘cifs’ service type from the list shown:

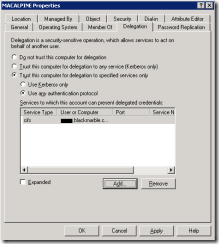
- Click OK to close the dialog, the computer object properties should look like the following:

- Click OK to apply the change
- Repeat the above steps for any other Hyper-V hosts servers.
You should now be able to remote mount ISO images from the server specified.